Managing AWS Accounts with Control Tower Account Factory for Terraform (AFT)
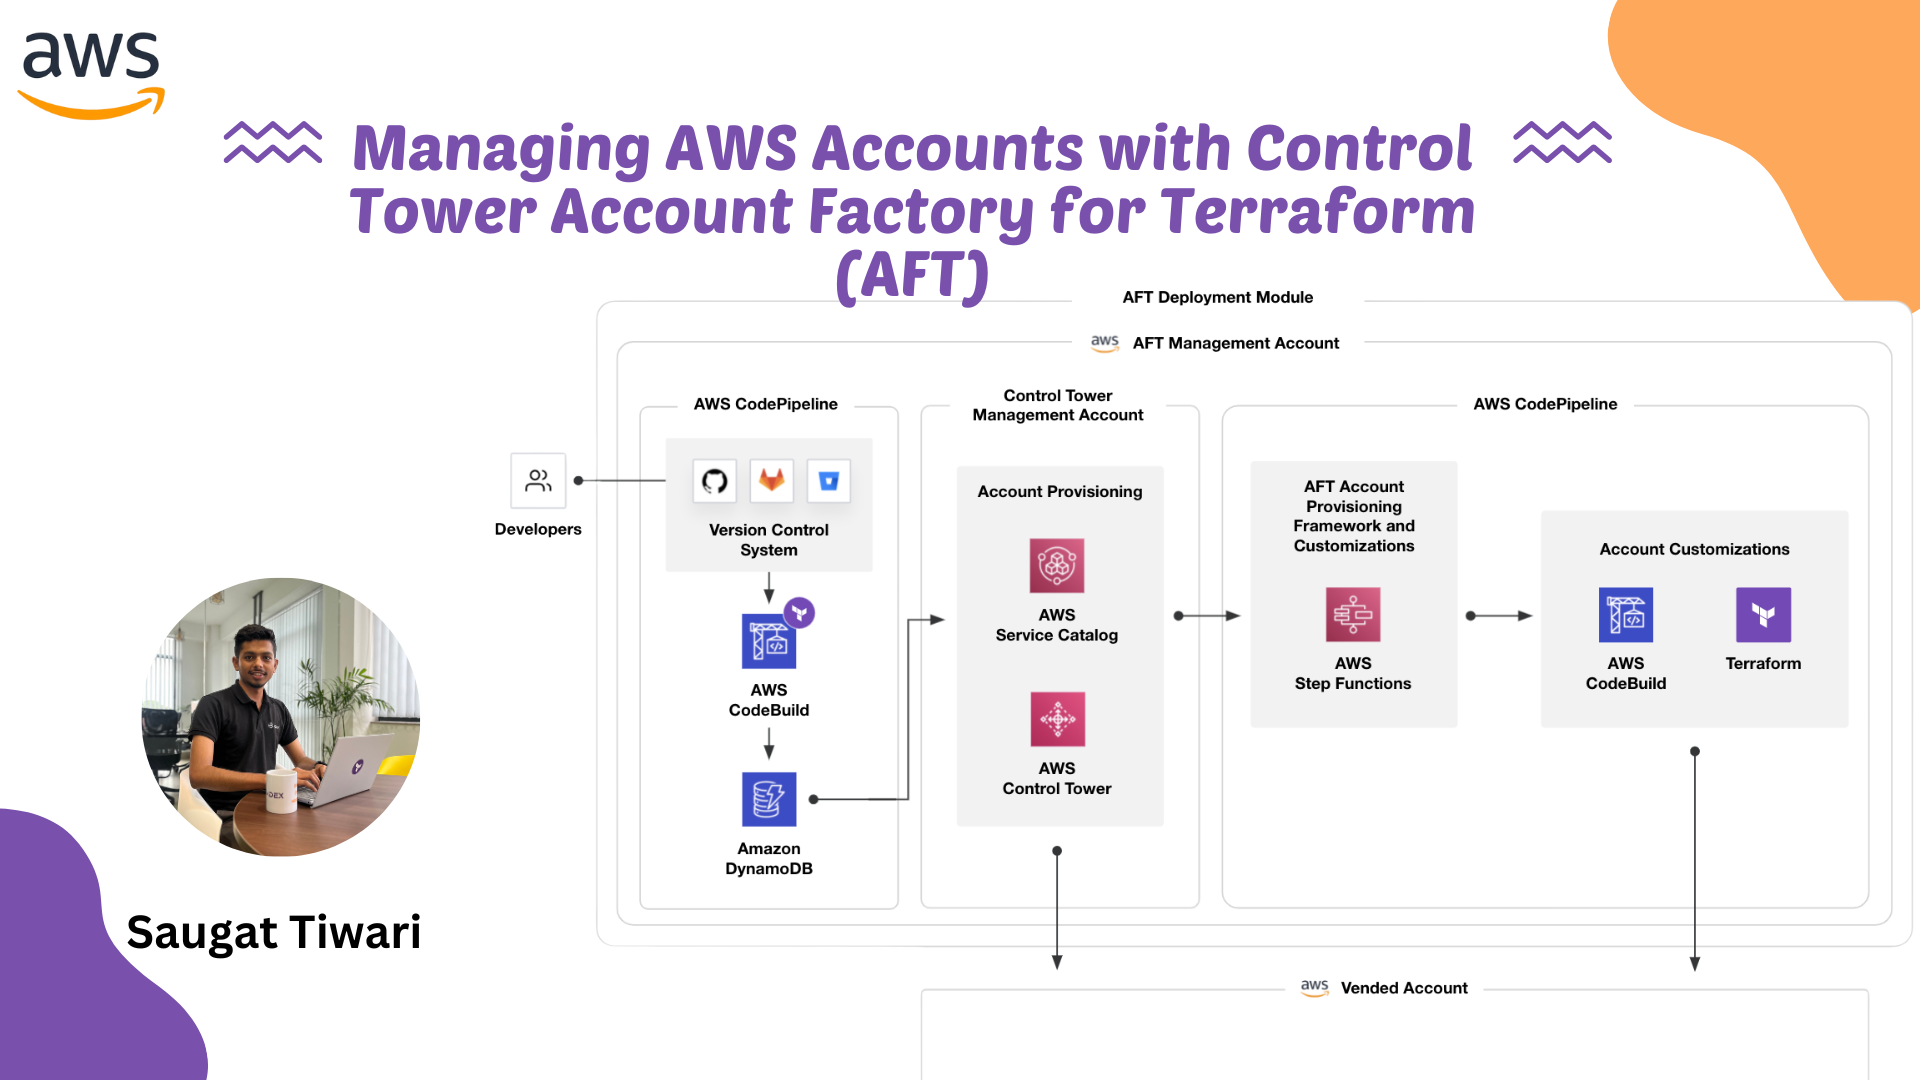
AWS Control Tower Account Factory for Terraform (AFT) is a Terraform module maintained by AWS that automates the creation and customization of new AWS accounts in a Control Tower environment. By adopting a GitOps model, AFT defines a pipeline of AWS services to provision accounts via Terraform while adhering to Control Tower’s guardrails and best practices. This allows user to use Terraform workflows to create accounts that are governed by AWS Control Tower, ensuring they meet your organization’s security guidelines from day one.
This blog provides a walkthrough of setting up AFT and using it to manage AWS accounts. It covers prerequisites, deployment steps, enabling necessary integrations, provisioning new accounts, managing user access via AWS SSO (IAM Identity Center), and highlights some challenges encountered during the process.
Prerequisites
Before implementing AFT, the following prerequisites must be in place:
- AWS Control Tower enabled: AWS Control Tower set up in the AWS organization, with the Management Account (root account where Control Tower is launched) and the default Log Archive and Audit accounts created.
- AWS IAM Administrator user: Use a non-root AWS IAM user with AdministratorAccess permissions. This user will be used to deploy AFT and should have credentials configured (access key, secret key) on your local machine.
- Terraform v0.15+: Install Terraform CLI (0.15 or later) on your local machine and configure it to use the above AWS credentials.
- AWS CLI: Install the AWS Command Line Interface for running auxiliary commands (e.g., to verify credentials).
- GitHub account: AFT uses Git repositories for its configurations. This blog post uses GitHub as the Version Control System (VCS) for the configuration repositories.
Setting Up the AFT Organizational Unit and Management Account
AFT requires a dedicated AFT management account separate from your Control Tower management account. It is recommended to create a new Organizational Unit (OU) in your AWS organization to contain this AFT account. The high-level steps are:
- Create a new OU for AFT: In the AWS Control Tower console (logged in as the Control Tower management account admin), navigate to Organizational Units and click Add an OU. Give it a name (e.g., “AFT” or “Account Factory”). Choose the root as the parent OU (since this is a top-level OU for AFT).
- Provision the AFT Management Account: Still in Control Tower (under Account Factory or the AWS Service Catalog interface), create a new account for AFT within the OU you just created. The Control Tower Account Factory can be used to enroll a new account. Provide a unique email (not used by any other AWS account) for this AFT account, an account name (e.g., “AFT Management”), and assign it to the new OU. Use the AWS SSO user details as prompted (first name, last name, email for SSO user), these can be placeholders for now. Launch the account creation. It typically takes 20–30 minutes to provision a new account in Control Tower.
- Record Account IDs: Once the AFT management account is created, note its Account ID. Also note the Account IDs of your Control Tower Management, Log Archive, and Audit accounts (these can be found in the AWS Organizations console or Control Tower dashboard). These IDs will be needed to configure the AFT Terraform module.
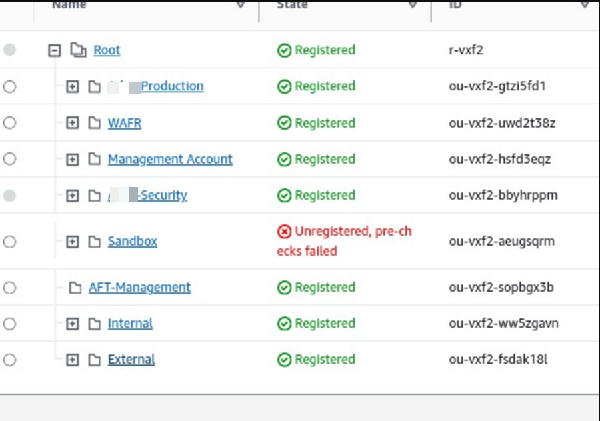
At this point, you have the organizational structure ready:
your AWS organization has a new OU for AFT and a new account dedicated to AFT operations. The Control Tower landing zone (multi-account environment set up by Control Tower) remains unchanged otherwise.
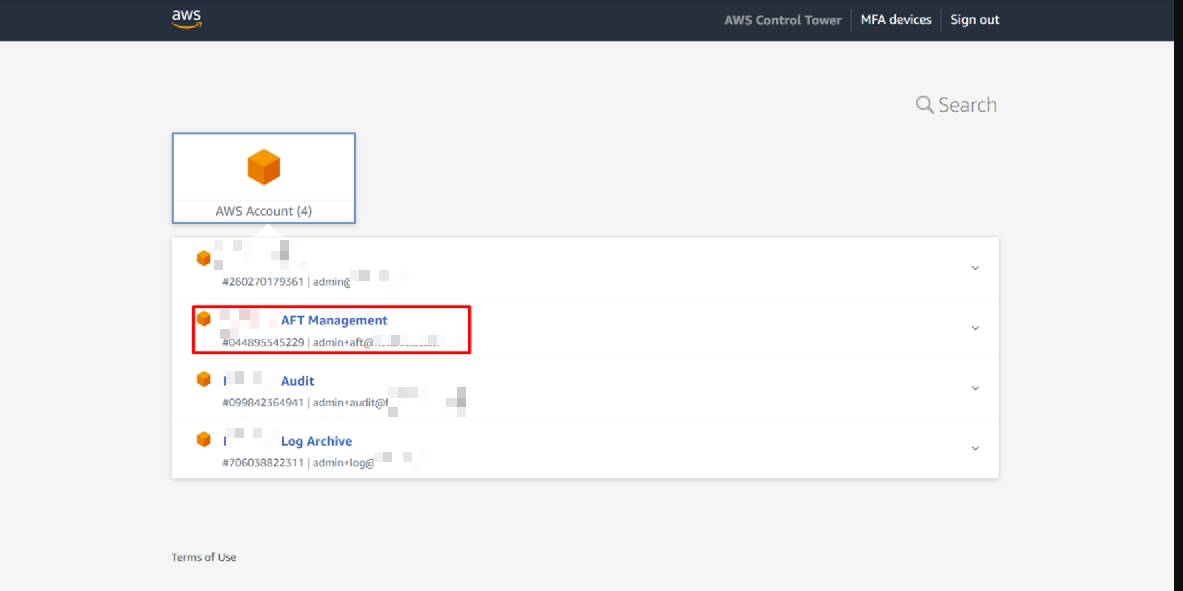
Fig: All prerequisite accounts for AFT
Cloning and Forking the AFT Configuration Repositories
AWS AFT uses a set of Git repositories to manage account provisioning and customization. In total, five repositories are involved:
- AFT Module Configuration Repository: This contains the Terraform code to deploy the AFT pipeline itself.
- Account Request Repository: Defines the AWS accounts to be provisioned (each account request is a Terraform module invocation).
- Account Provisioning Customizations Repository: (Optional) Contains Terraform or code to run at account provisioning time (via Step Functions) for all new accounts.
- Global Customizations Repository: Contains baseline custom Terraform configurations that AFT will apply to all accounts it creates.
- Account Customizations Repository: Contains custom Terraform configurations for specific accounts or groups of accounts (e.g., prod vs. dev accounts).
By default, the AFT module can auto-provision CodeCommit repositories for these, but it supports other VCS providers like GitHub, Bitbucket, or GitHub Enterprise.
- In this case, Github is used as VCS provider for AFT.
Steps to prepare the repos:
-
Clone the AFT module repo: AWS provides an example Terraform configuration for AFT. Clone the Terraform configuration repository (for example, hashicorp-education/learn-terraform-aws-control-tower-aft on GitHub) to local environment. This repo contains the Terraform module call that deploys AFT.
-
Fork the four configuration repos: There are four HashiCorp Learn repositories (on GitHub) that serve as templates for the account request and customizations. Fork the following repos into your own GitHub account:

https://github.com/<orgid>/terraform-aws-control-tower-afthttps://github.com/hashicorp/learn-terraform-aft-account-request https://github.com/hashicorp/learn-terraform-aft-global-customizations https://github.com/hashicorp/learn-terraform-aft-account-customizations https://github.com/hashicorp/learn-terraform-aft-account-provisioning-customizations- learn-terraform-aft-account-request – Template for account requests (provisioning new accounts via AFT).
- learn-terraform-aft-global-customizations – Template for global customizations (applied to all AFT-provisioned accounts).
- learn-terraform-aft-account-customizations – Template for account-specific customizations.
- learn-terraform-aft-account-provisioning-customizations – Template for provisioning-time customizations.
-
Clone your forked repos: Once forked, clone each of the four repos from your GitHub account to your local machine (so you can edit and push changes). For example, for the account request repo: git clone https://github.com/
/learn-terraform-aft-account-request(and similarly for the other three).
.
├── learn-terraform-aft-account-customizations
├── learn-terraform-aft-account-provisioning-customizations
├── learn-terraform-aft-account-request
├── learn-terraform-aft-global-customizations
└── terraform-aws-control-tower-aft
After this step, five directories should be available locally: one for the main AFT Terraform module configuration and four for the account configuration repositories. These directories are customized and used in the subsequent steps.
Deploying the AFT Terraform Module
Now it’s time to deploy the AFT pipeline itself using Terraform. The main Terraform configuration (in the module repo you cloned) will set up all necessary AWS resources across your accounts (Control Tower mgmt, Log Archive, Audit, and AFT account) to enable the AFT workflow. This includes AWS CodePipelines, CodeBuild projects, Lambda functions, DynamoDB tables, SNS topics, S3 buckets, IAM roles, etc., that make up the Account Factory pipeline.

Fig: Account Creation Flow using AFT
-
Configure AWS Credentials: Ensure your AWS CLI/Terraform is using the credentials of the Control Tower management account administrator user. For example, set environment variables or update your AWS profile:
export AWS_ACCESS_KEY_ID=<YourAccessKeyID> export AWS_SECRET_ACCESS_KEY=<YourSecretKey> export AWS_DEFAULT_REGION="us-east-1" # or your Control Tower home region aws sts get-caller-identity -
Update AFT Terraform variables: In the learn-terraform-aws-control-tower-aft repo (the main module config), open the terraform.tfvars file (or create one) and set the required variables with the IDs and info you collected:
# terraform.tfvars
ct_management_account_id    = "123456789012"  # Control Tower management (root) account ID
log_archive_account_id      = "234567890123"  # Log Archive account ID
audit_account_id            = "345678901234"  # Audit account ID
aft_management_account_id   = "456789012345"  # The new AFT management account ID
ct_home_region              = "us-east-1"     # Region where Control Tower is deployed
tf_backend_secondary_region = "us-west-2"     # Secondary region for Terraform state replication
github_username             = "<YourGitHubUsername>"
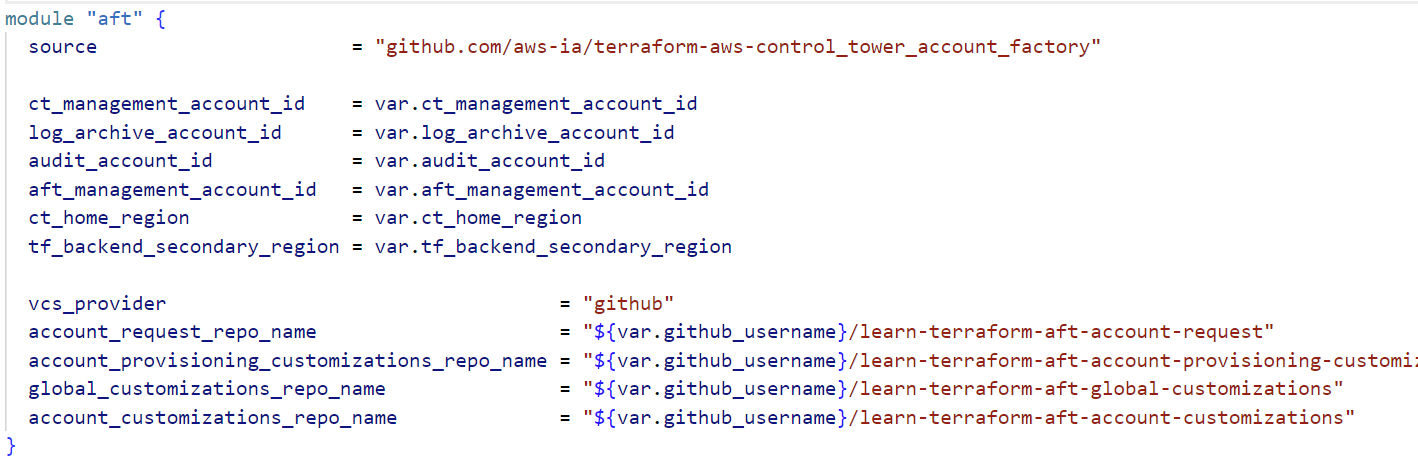
module "aft" {
  source  = "github.com/aws-ia/terraform-aws-control_tower_account_factory"

  ct_management_account_id    = var.ct_management_account_id
  log_archive_account_id      = var.log_archive_account_id
  audit_account_id            = var.audit_account_id
  aft_management_account_id   = var.aft_management_account_id
  ct_home_region              = var.ct_home_region
  tf_backend_secondary_region = var.tf_backend_secondary_region

  vcs_provider  = "github"
  account_request_repo_name   = "${var.github_username}/learn-terraform-aft-account-request"
  global_customizations_repo_name = "${var.github_username}/learn-terraform-aft-global-customizations"
  account_customizations_repo_name = "${var.github_username}/learn-terraform-aft-account-customizations"
  account_provisioning_customizations_repo_name = "${var.github_username}/learn-terraform-aft-account-provisioning-customizations"
}
Running aws sts get-caller-identity is a good way to verify that the AWS credentials is valid, the output should show the Account as your Control Tower management account ID.
Here we set vcs_provider = “github” and point the module to our forked GitHub repos (by username). Ensure that these repository names match the GitHub forks. The module will create CodePipeline connections to these repos.
-
Initialize and apply Terraform: Navigate to the main module repo directory and run Terraform initialization, plan and apply:
terraform init
terraform plan
terraform apply
Terraform will output a plan of resources (hundreds of resources to be created) – review and type “yes” to confirm.
At this stage, AFT is deployed. Behind the scenes, it has set up multiple AWS CodePipelines (for account provisioning and customizations), CodeBuild projects, AWS Lambdas, an Amazon DynamoDB table (to queue account requests), Amazon SQS queues, AWS Step Functions state machines, and more, across the various accounts. Essentially, AFT established an automated pipeline to vend new accounts through Control Tower in a Terraform-driven, consistent manner.
Enabling the GitHub Connection (CodeStar)
Since we configured AFT to use GitHub as the VCS, the AFT module created a pending CodeStar Connections entry to link AWS CodePipeline to GitHub. We must approve and connect this pending connection manually (one-time setup).
-
Log in to AFT Management Account: Open a new browser (or incognito window) and log in to the AWS console using the AFT management account credentials (the email and password for the new account, or via AWS SSO if set). This account now hosts the CodePipelines for AFT.
-
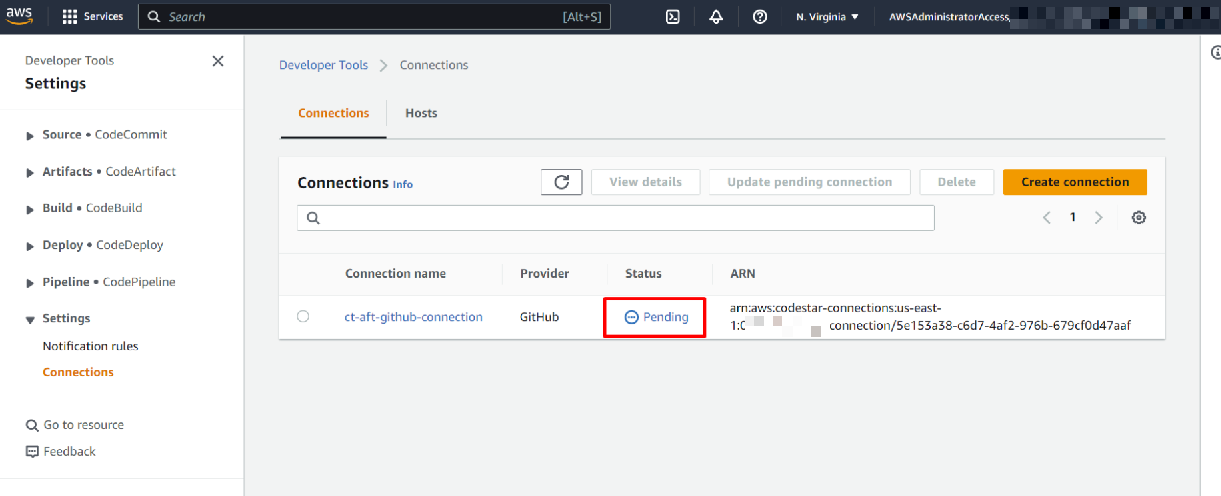
Navigate to AWS CodeStar Connections: In the AWS console for the AFT account, go to AWS CodePipeline > Settings > Connections, or simply search for “CodeSuite Connections”. You should see a connection named ct-aft-github-connection in Pending status.
Fig: CodeStar Connection Status as “Pending”
-
Approve the GitHub connection: Click the pending connection. On the details page, choose Update pending connection.
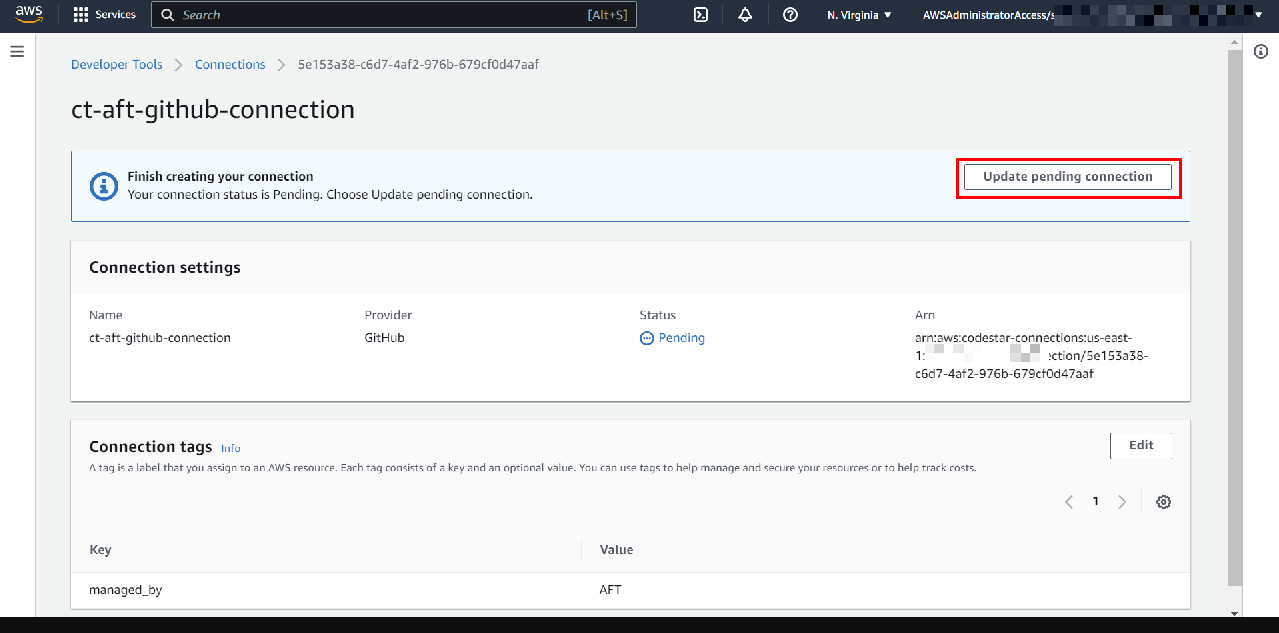
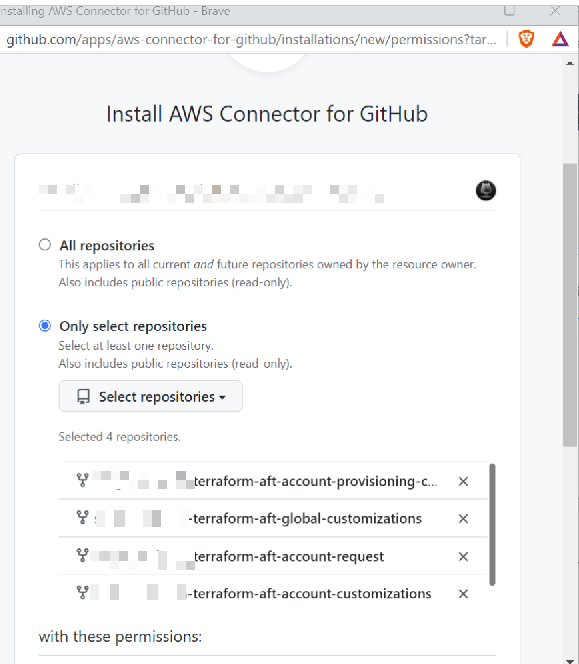
This will open a workflow to authorize AWS to connect to your GitHub. Follow the steps to Install the AWS Connector for GitHub on your GitHub account (you may be redirected to GitHub to approve the app). Once done, return and click Connect.
The connection status should change to Available, indicating AWS CodePipeline can now pull code from your GitHub repos.
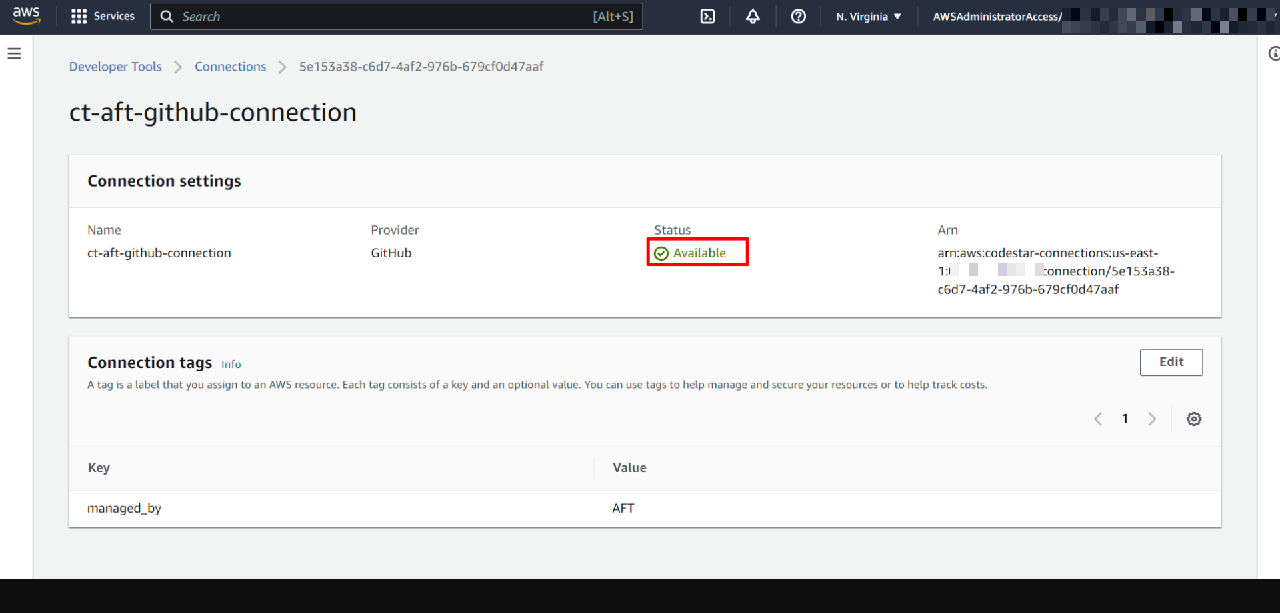
After this step, the AFT pipelines are authorized to watch your GitHub repositories for changes.
Granting AFT Access to the Account Factory Portfolio
Although AFT runs in the separate AFT account, it needs to create accounts in your Control Tower environment. New accounts in Control Tower are provisioned via the AWS Service Catalog Account Factory product. By default, only the Control Tower management account has access to that Service Catalog portfolio. We must grant the AFT pipeline permission to use the Account Factory product.
-
Log in to Control Tower Management Account: In another browser or session, log back into the AWS console as the Control Tower management account administrator.
-
Open Service Catalog Portfolios: Navigate to AWS Service Catalog > Portfolios.
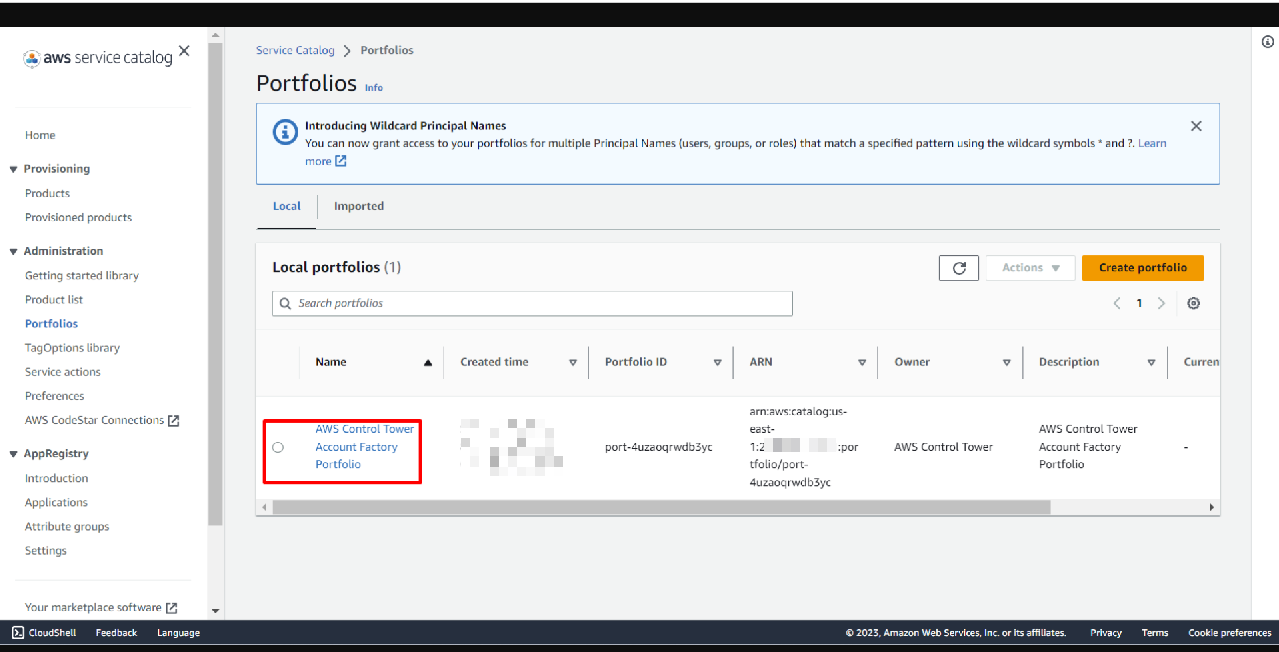
Find the portfolio named “AWS Control Tower Account Factory Portfolio” and click it.
-
Grant Access to AFT Execution Role: In the portfolio details, go to the Access (or “Groups, roles, and users”) tab. Click Add access (or Grant access). Then, under Roles, search for AWSAFTExecution this IAM role was created by the AFT module in the Control Tower management account.
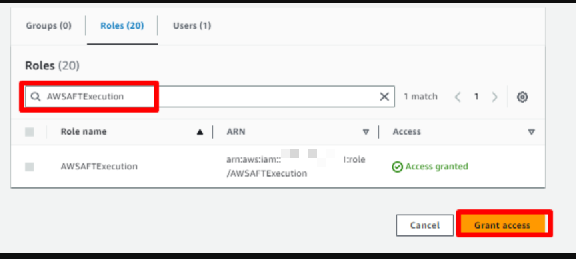
Select the AWSAFTExecution role and click Add access to grant it access to the Account Factory portfolio.
By doing this, we allow the AFT pipeline (which assumes the AWSAFTExecution role when running in the Control Tower account) to use the Account Factory product to create new accounts. Essentially, AFT can now programmatically invoke the same account creation process that you would via the Service Catalog UI.
Rerunning the AFT Pipelines (Post-Deployment)
When AFT was first deployed, it automatically triggered its pipelines. However, since we had not yet approved the GitHub connection at that time, the Account Provisioning pipeline likely failed to run to completion. Now that the connection is active and permissions are set, we should manually rerun the pipeline to ensure everything is in sync.
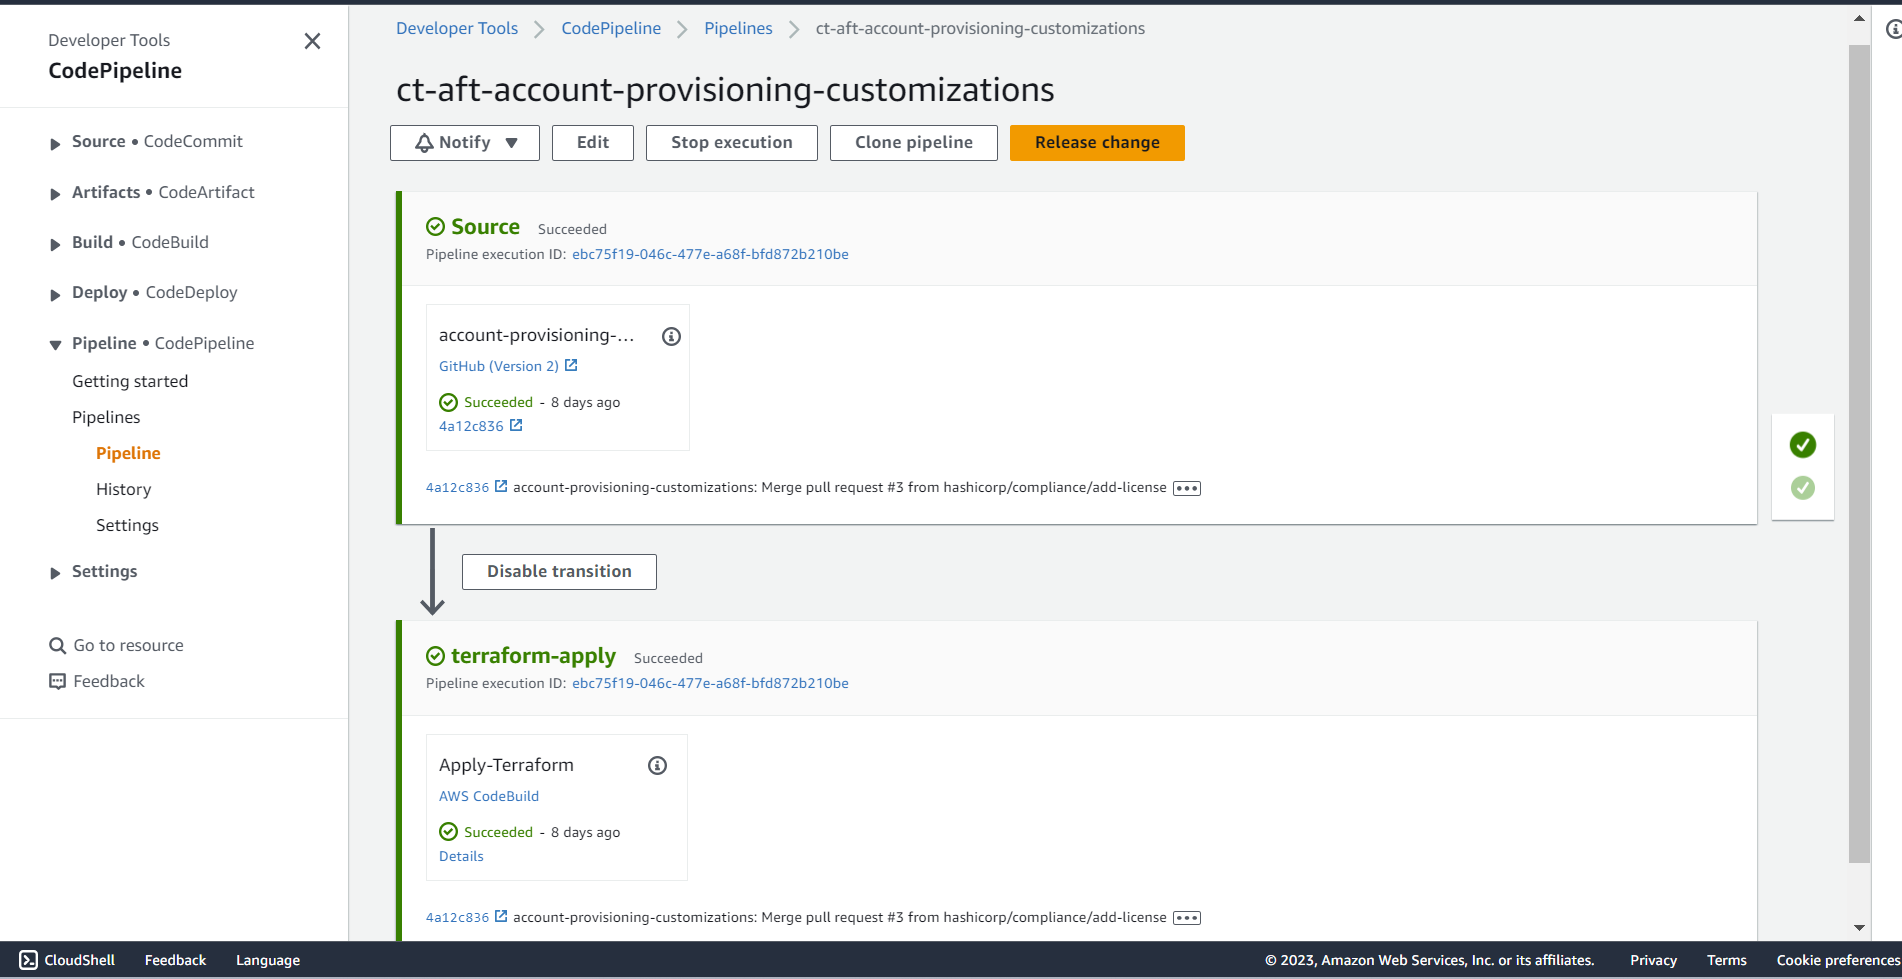
- In the AFT management account console, go to AWS CodePipeline service. You should see a pipeline named ct-aft-account-provisioning-customizations (this pipeline handles provisioning-time customizations for accounts). Its last run might show a failed state.
- Click on that pipeline to view details, then choose Release change (or a similar button to rerun the latest change through the pipeline). Confirm the release. This will start the pipeline execution again.
- Monitor the stages of the pipeline until it shows success for all stages. This pipeline run creates any remaining resources and ensures the environment is ready for account provisioning.
At this point, all one-time setup steps for AFT are complete: the pipelines are deployed and configured, and the integration with GitHub and Service Catalog is enabled. We can now use AFT to provision new accounts through GitOps (by pushing changes to our account request repo).
Provisioning New AWS Accounts with AFT
With AFT set up, creating a new AWS account is as simple as writing a Terraform configuration in the account request repository and pushing it to GitHub. The AFT workflow will detect the change and automatically provision the account in Control Tower, then apply any customizations.
Let’s go through an example where we create multiple accounts (e.g., Prod, Dev, UAT, Networking accounts for a fictitious company):
-
Define account requests in code: Open the learn-terraform-aft-account-request repository (fork) on your local machine. Navigate to the terraform/ directory. In the main.tf file, define a new module block for each account you want to create. For example:
module "prod" {
  source = "./modules/aft-account-request"

  control_tower_parameters = {
    AccountEmail              = "admin+prodacc@<domain>.com"
    AccountName               = "Prod"
    ManagedOrganizationalUnit = "Production Workload"
    SSOUserEmail              = "admin+prodacc@<domain>.com"
    SSOUserFirstName          = "admin"
    SSOUserLastName           = "prod"
  }

  account_tags = {
    ProvisionedVia = "AFT"
  }

  change_management_parameters = {
    change_requested_by = "DevOps Team"
    change_reason       = "AWS Control Tower Account Factory for Terraform"
  }

  custom_fields = {
    group = "prod"
  }

  account_customizations_name = "Prod"
}
The above defines a Production account with its email, name, the Control Tower OU it should go into (e.g., “Production Workload” OU must exist in Control Tower), and SSO user info (the initial SSO user name for the account). We also tag the account and provide some metadata like who requested it and why (these are optional fields AFT can log). The account_customizations_name is used to tie this account to any account-specific configs in the account customizations repo (e.g., a folder named “Prod” in that repo).
Similarly, you can add modules for a Dev, UAT, and Networking account, for example:
module "dev" { ... }      # with AccountEmail admin+dev@<domain>.com, Name "Dev", OU "Workload", etc.
module "uat" { ... }      # with AccountEmail admin+uat@<domain>.com, Name "UAT", OU "Workload", etc.
module "networking" { ... }  # with AccountEmail admin+networking@<domain>.com, Name "Networking", OU "Workload", etc.
Each module should have unique emails and names. In our example, we use plus-addressing on a single admin email for simplicity (e.g., admin+dev@
- Commit and push changes: After adding the desired module blocks, save main.tf, commit the changes to git, and push to your GitHub repository (learn-terraform-aft-account-request). For instance:
git add terraform/main.tf
git commit -m "Add prod, dev, uat, networking account requests"
git push origin main
- AFT pipeline in action: Once you push, the AFT Account Request pipeline (in the AFT management account) will detect the change (via the CodeStar connection) and start processing the new account requests. Under the hood, AFT will:
- Create new items in the DynamoDB table representing each account request (one item per module instance).
- A Lambda function will pick up the DynamoDB inserts and enqueue the requests in an SQS queue for processing.
- Another set of Lambdas and Step Functions will read from SQS and initiate the account provisioning through Control Tower (calling the Account Factory to create each account).
- AFT sets up each new account with an IAM role (AWSAFTExecution) and a CodePipeline for customizations. After the account is created by Control Tower, AFT triggers the customizations pipelines to apply the global and account-specific Terraform configurations to that account.
One major advantage of AFT is that it queues and processes multiple account creations in parallel (via the DynamoDB and SQS mechanism), whereas doing this manually in Control Tower you could only create one account at a time. This makes bulk account provisioning much more efficient.
-
Account provisioning time: Control Tower account creation still takes ~20-30 minutes per account. AFT will handle them asynchronously, but expect each new account to be ready in about that time. You can monitor progress in the AWS CodePipeline console (AFT account), pipelines for each new account will start executing for customizations. If there are errors, they will surface in CodePipeline/CodeBuild logs.
-
Verify new accounts: After the process completes, go to the Control Tower console (in the management account) and check the Accounts or Organizational Units section. You should see the newly created accounts (e.g., Prod, Dev, etc.) listed under their respective OUs. For example, if “Workload” OU was specified for Dev/UAT/Networking, those accounts will be in that OU. The Prod account we put under “Production Workload” OU will appear there. Essentially, your AWS landing zone now includes these accounts, fully enrolled and baselined by Control Tower.
Before creating these accounts, our Control Tower landing zone only had the core accounts (Management, Log Archive, Audit) and the AFT account. After running AFT, we have multiple new workload accounts added automatically.
Setting Up SSO Access for New Accounts
AWS Control Tower relies on AWS IAM Identity Center (formerly AWS Single Sign-On) to manage user access across . When a new account is created via Control Tower, it is integrated into IAM Identity Center, but you need to set up users, groups, and permission sets to allow access to those accounts.
Here’s how to grant your team access to the newly created accounts:
-
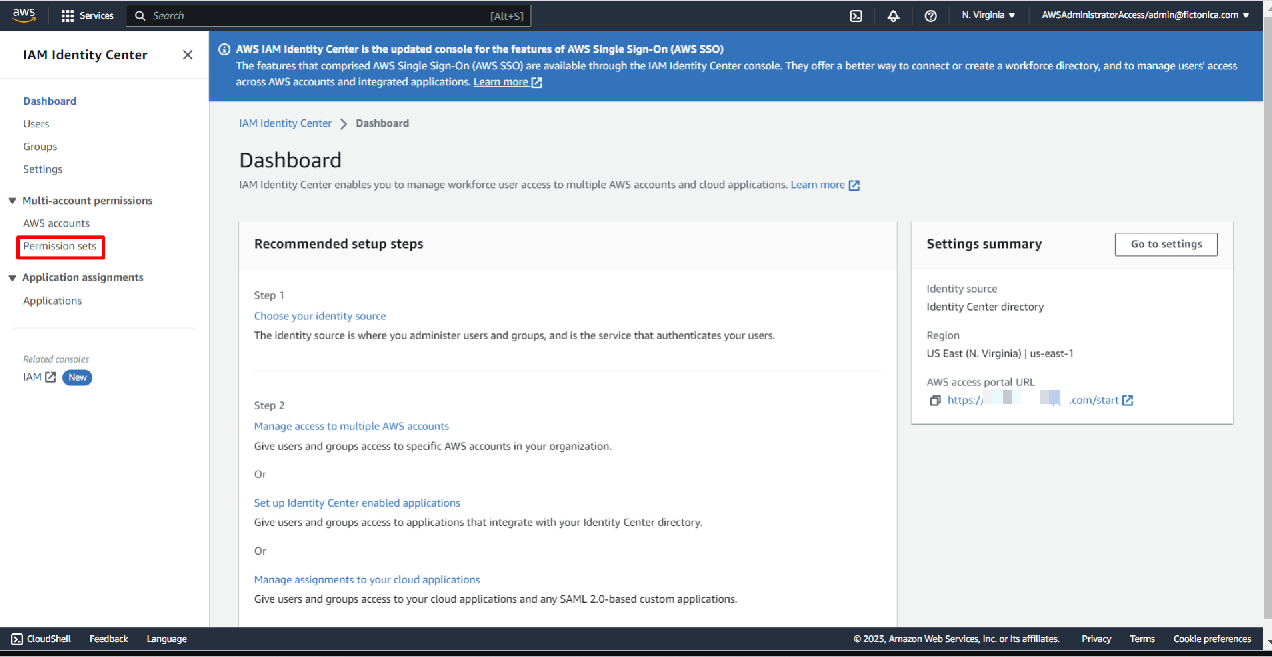
Permission Set Creation: In the AWS Control Tower management account, go to the IAM Identity Center (Successor to AWS SSO) service.

Navigate to Permission sets and click Create permission set.
Choose Create a custom permission set unless you want to use a preset. For example, you might create a permission set called “AWSDeveloper” that grants administrative access (or a subset of permissions) for developers in those accounts. You can attach AWS managed policies or custom policies to define the exact permissions. Complete the creation steps (you can add tags if needed) and finish creating the permission set. Remember the name of the permission set (e.g., AWSDeveloper).
-
Create User Group: In IAM Identity Center, go to Groups and click Create group.
Name the group (e.g., AWSDeveloper to correspond with the permission set, or any name representing the team). You don’t need to assign users here yet aside from naming.
-
Create Users and Assign to Group: Still in IAM Identity Center, go to Users and click Add user.
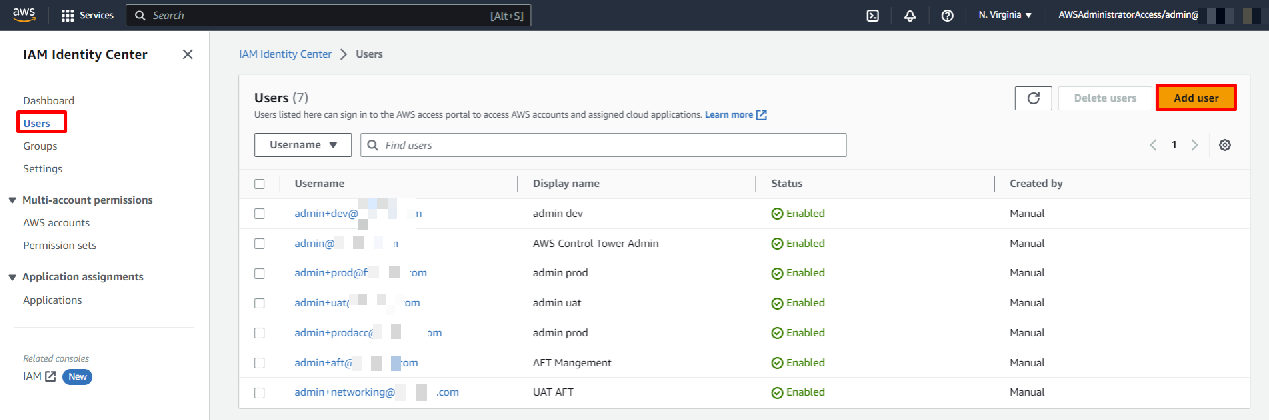
Fill in the user’s details (name, email). For password, you can select the option to generate a one-time password (so the user will reset on first login). On the next step, add the user to the group you created (e.g., AWSDeveloper). Repeat for any additional users you need to onboard, or you can add multiple users to the group later.
-
Assign Access to Accounts: Now that you have a user group and a permission set, link them to the new accounts. In IAM Identity Center, go to AWS accounts. You should see a list of accounts in your organization. Find and select the new accounts (e.g., Dev, Prod, etc. You can check by the account names or IDs). Click Assign users/groups. In the wizard:
- Select the Group you created (e.g., AWSDeveloper).
- Select the Permission Set (e.g., AWSDeveloper permission set that you created).
- Complete the assignment.
This process grants all users in the AWSDeveloper group the permissions defined in the AWSDeveloper permission set on the target accounts. For example, if the permission set grants AdministratorAccess, the group members will have admin access on those accounts via SSO.
Now your team members can go to the IAM Identity Center user portal (the URL is provided when you set up IAM Identity Center, or via the AWS SSO link), log in with their credentials, and they will see the new AWS accounts available to assume. This allows centralized access management: you can add/remove users from the group to govern who can access those accounts, rather than managing separate IAM users in each account.
Challenges and Solutions
During our AFT setup and usage, we encountered a few common issues:
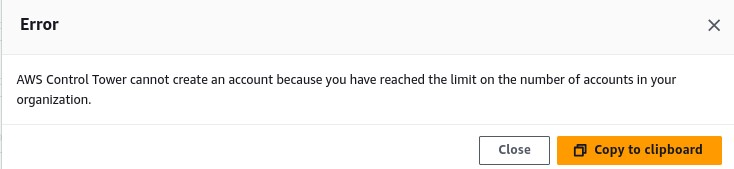
AWS Account Quota Limit: By default, new AWS organizations have a quota of 10 accounts maximum. If you attempt to create more accounts than your limit, account provisioning will fail with an error. We hit this limit since Control Tower itself creates a few accounts (Management, Log, Audit, AFT) and our new accounts exceeded the default.
Solution: Request a quota increase for AWS Organizations account limit through AWS Support. AWS can raise it significantly (up to 10,000 accounts with proper justification).
CodeBuild Concurrency Limit: AFT’s pipelines use AWS CodeBuild projects, and by default some AWS accounts were limited to only 1 concurrent build at a time. AFT triggers multiple builds concurrently (for multiple account requests and customization pipelines), which led to errors like “Cannot have more than 1 builds in queue for the account.” This is a known recent AWS default for new accounts (often set to 1 concurrent build).

Solution: Submit a Service Quotas increase for CodeBuild concurrent builds. Increase the limit (e.g., to 5 or 10 concurrent builds) for the CodeBuild compute types you use. After AWS approved the increase, the pipelines could run in parallel as intended.
Failed CloudFormation Stack (KMS issue): Initially, our Control Tower setup (unrelated to AFT) failed because we had a custom AWS KMS encryption setting that interfered with Control Tower’s stack sets. Specifically, enabling an organization-wide AWS Config aggregator with a KMS CMK caused a conflict.

Solution: We had to disable or remove the custom KMS encryption during Control Tower initialization. In our case, setting up Control Tower without that custom KMS (using the default settings) allowed the launch to succeed. If you encounter CloudFormation errors during Control Tower setup, check for any existing security configurations (like KMS, Config, etc.) that might be incompatible and try again.
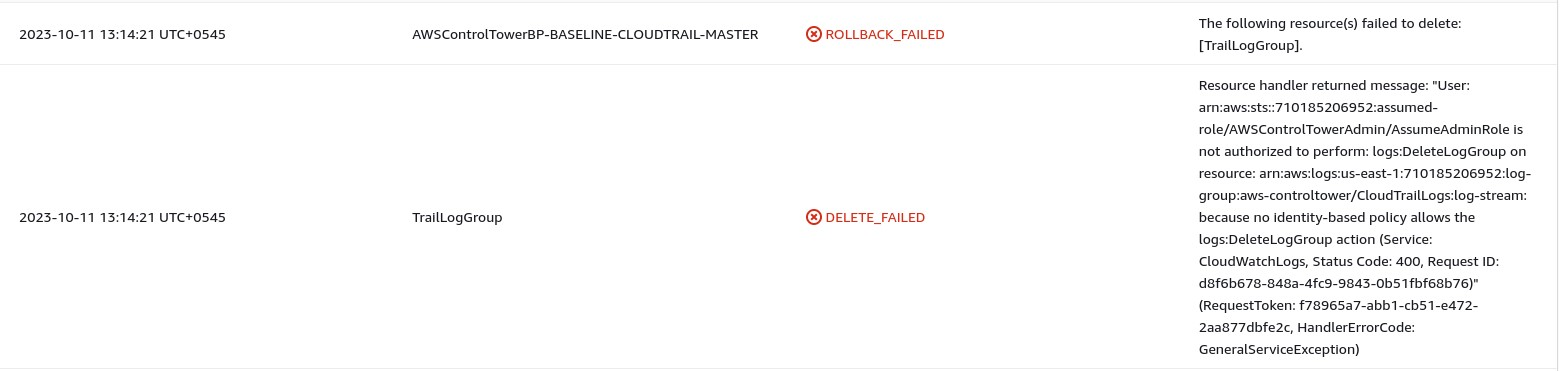
Pre-checks Failed for Account Enrollment: When trying to enroll an existing AWS account into Control Tower (by moving it into a registered OU), we saw a “pre-checks failed” error. The error report indicated an AWS Config recorder was already enabled in that account, which prevented Control Tower from taking over (Control Tower expects to set up AWS Config itself). This is a common issue: Control Tower cannot enroll accounts that have pre-existing Config recorders, SNS topics with clashing names, or other baseline configurations.
Solution: We deleted the existing AWS Config Configuration Recorder and Delivery Channel in all regions for that account, and then retried the enrollment. The pre-checks passed once the conflicting Config setup was removed. (In general, to enroll an existing account, ensure it’s “clean” of certain resources like Config, CloudTrail, etc., as per AWS documentation.)
Terminology
- Management Account (Control Tower): The primary AWS account where AWS Control Tower is enabled (often your AWS root account). This account is the administrator of the AWS organization and the landing zone. AFT requires this account’s ID for certain cross-account roles and operations.
- AFT Management Account: The dedicated AWS account used to deploy and run Account Factory for Terraform. This is separate from the Control Tower management account. The AFT pipeline’s infrastructure (CodePipelines, Lambdas, etc.) lives here, but it orchestrates account creation in the Control Tower environment.
- Provisioned Account: An AWS account created through the Control Tower Account Factory (whether via the Service Catalog UI or AFT). Control Tower sets up baseline resources and guardrails in these accounts. In our context, the new Prod/Dev/UAT accounts we created are provisioned accounts.
- Portfolio (AWS Service Catalog): A portfolio is a collection of products in AWS Service Catalog, along with configuration that defines who can access them and how they can be launched. In Control Tower, the Account Factory portfolio contains the product for creating new accounts. We granted AFT access to this portfolio to allow account provisioning.
- Product (AWS Service Catalog): A product is an IT service or stack that you make available for deployment via Service Catalog. It consists of one or more AWS resources defined (often by a CloudFormation template). The Account Factory product in Control Tower is an example – it’s a blueprint for provisioning a new AWS account (with CloudFormation under the hood).
- Constraints (Service Catalog Constraints): Constraints are rules that control how a Service Catalog product can be deployed. They can limit options or enforce specific settings when users launch a product. For example, a launch constraint can specify a particular IAM role to use, and template constraints can restrict parameter values. In short, constraints restrict the ways that specific AWS resources can be deployed for a product.
- Landing Zone: In AWS Control Tower, the landing zone refers to the overall multi-account environment that Control Tower sets up for you. This includes the AWS organization, the baseline OUs (like the Security OU with Log Archive and Audit accounts), guardrails (policies), and the Account Factory. It’s the framework on which all your governed accounts reside.
By understanding these terms, it’s easier to navigate the AFT setup, since a lot of the configuration revolves around cross-account roles and products/portfolios from Service Catalog.
At Glance:
With AWS Control Tower Account Factory for Terraform in place, AWS account management becomes more automated and scalable. You can now create new accounts by simply committing code, ensure they come out of the box compliant with your organization’s standards, and manage access to those accounts centrally via IAM Identity Center. This marries the Infrastructure-as-Code benefits of Terraform with the governance of Control Tower, giving you the best of both worlds for multi-account AWS environments.
References
- AWS Documentation: Provision accounts with AWS Control Tower Account Factory for Terraform (AFT)
- HashiCorp Learn Tutorial: https://developer.hashicorp.com/terraform/tutorials/aws/aws-control-tower-aft
- AWS Cloud Operations Blog: https://developer.hashicorp.com/terraform/tutorials/aws/aws-control-tower-aft
Stay tuned for more. Let’s connect on Linkedin and explore my GitHub for future insights.